

MAXfocus Web Protection:
Avoiding the Pitfalls
Web Protection can be
a sensitive topic in companies today. Not allowing a user to go where they once
were allowed can cause hard feelings. The importance of great communication
between you, the client and the client’s employees is paramount to a successful
Web Protection implementation. In this article we will not only step through
the configuration of Web Protection, but we will discuss how to ensure that
your clients and your client’s employees are provided with necessary
information and have proper expectations for this change.
What’s the First Step?
Have an initial
conversation about Web Protection with your client and ask some key questions:
“Do
you currently have a written company policy on employee Internet usage”?
If your client has a policy in place, ask for a copy of it
and inquire as to how they currently enforce the policy. If they don’t then
have some examples of how companies are protecting themselves against legal
liability with web protection.
“Would you be interested in an evaluation on
the way your company utilizes the Internet”?
Explain the value of understanding how their company’s
Internet usage effects speed and productivity of their employees. Ask how much
of their current bandwidth are they using? How many requests are made to social
media sites a day? What applications are using the majority of bandwidth? All
of these questions and more can be answered by deploying the Web Protection on
the client’s computers with a policy in place that blocks nothing and then
running a Web Protection Overview Report in your Dashboard: this document then
becomes a powerful sales tool.
 In addition to being
a sales tool, this document is a road map for both a discussion with your
client but a guide to a successful deployment. You can sit down with your
client and show them where their employees are spending their time on the
Internet and also have a complete list of websites that company utilizes for
business purposes. Often times the company will want a category blocked;
however, they will want a website within that category whitelisted. There is
nothing worse to constantly get calls from your client telling you their
business applications are blocked because you turned on Web Protection without
In addition to being
a sales tool, this document is a road map for both a discussion with your
client but a guide to a successful deployment. You can sit down with your
client and show them where their employees are spending their time on the
Internet and also have a complete list of websites that company utilizes for
business purposes. Often times the company will want a category blocked;
however, they will want a website within that category whitelisted. There is
nothing worse to constantly get calls from your client telling you their
business applications are blocked because you turned on Web Protection without
analyzing their current usage.

Building the first Web Protection Policy:
The first task you want to complete is to create a Web
Protection Policy that does not block anything.
Click on Settings > Web Protection > Protection Policy
and then click on the New button.

The next step is to select a name for the policy and to
select a base policy.

 Open the Web Security and web Filtering and “Allow” all the
existing Blocked Categories and click Save..
Open the Web Security and web Filtering and “Allow” all the
existing Blocked Categories and click Save..
Creating the Web Protection Overview Report:
After a week or more has passed, run a Web Protection Overview
Report: Click on Reports > Web
Protection Reports > Overview Report.

Client Conversation:
Take this report and have an in depth conversation with your
client about their company’s web policy and then base your sales presentation
on the value of the Web Protection Service. Be sure not to sell the service
short… It has substantial value to most clients.
Deploying Web Protection:
Use the Web Filtering by URL section of the report to help
guide you in building a custom policy. You want to ensure you aren’t filtering
any legitimate sites they are hitting for business purposes. Since a single
site may have more than one category, you don’t want to accidentally block a website
that the company uses for business purposes.

Add as many of the legitimate business application sites to
the whitelist as you need to in order to ensure they don’t get blocked.
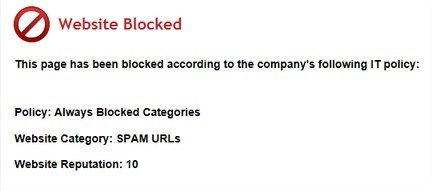
The Importance of the Block Message:
The Block message should contain as much information as to
why the page was blocked and who it was blocked by. It is a good idea to let
the users know it is their company’s policy is why the page is blocked and it
is not you the MSP blocking it.
Since this message is created using basic HTML, you can even
insert the client’s company logo into the block message.
You can also use the provided variables to show the Policy
Name, Category and Website Reputation:
<p>
<div>Policy:
!policy!!</div>
<div>Website
Category: !category!!</div>
<div>Website
Reputation: !reputation!!</div>
</p>
</b>

Good Luck on you Web Protection Deployment!