
In MSP Mail we do have a lot of helpful documentation but one request I see a lot of is to have a guide for the end user portal. Something short and concise that users can refer to if they are unsure how to navigate and take advantage of the different features. As I have had this quite a few times I created a guide that you can send to your end users. This covers everything in the user portal so feel free to direct customers to it or use it to create your own internal documentation.
End Customer quick user
guide for Mail Protection
Contents:
1.
Finding and releasing queued or junk mail
messages
2.
Managing Whitelists and Blacklists
3.
Digests and releasing emails
Finding and releasing queued or junk mail messages
After logging into the mail control panel
queued or quarantined emails can be managed by clicking on the ‘Messages’ icon
in the upper right hand corner.

In here the options available are

Junk
Mail Quarantine – Any emails classed as spam or malicious will be held
here.
Message
Queue – In the event mail cannot be delivered to the recipient it will
queue in this section.
Message
Archive (if archiving is enabled) – Allows the ability to search for any
emails that have been archived
Tagged
Messages (if archiving is enabled) – Allows a quick search for any archived
email using tags
Both the junk mail quarantine and message
queue use a similar method for viewing the contents of the emails as well as
releasing or responding to them. When in
either section you will see the list of items available in the respective
sections
Click onto the ‘From’ address or ‘Subject’
and you will be redirected to the contents of the email. In here you have options to perform the
following

With the inbound message queue area there will be an additional option at
the right hand side to compose a new mail message. This option is here if you have any internal
email problems as the mail portal will allow you to both send and receive email

Below is a copy of the new message form

Managing Whitelists and Blacklists
For any configuration changes in the user
portal you would need to click on the ‘Preferences’ icon in the upper right
hand corner of the control panel

After clicking into this section all the configurable
items are shown in the black menu bar
Spam
Handling – Allows control of how strict the spam filter is on email
filtering. The end results of any spam
emails can be configured in here as well (e.g. send to quarantine).
Whitelist
– Configure a personal whitelist
Blacklist
– Configure a personal blacklist
Digests
and Notifications – Configure digest options
Account Settings – Set time zone and language settings
Account Settings – Set time zone and language settings
Message
Settings – set the number of messages that can be viewed at one time in the
quarantine and mail queue lists
Archive
– Set archive tags, export archived messages and delegate access to your
archive
Password
– Set a unique password for logging into the control panel. If you are using a local network password
this will act as an additional password for logging into the control panel
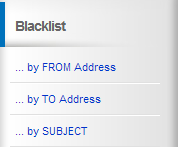
When blacklisting or whitelisting an email
you would click on the respective options in the black menu bar. From here the various options for
blacklisting and whitelisting will appear in the left hand side grey menu

When entering the ‘from’ or ‘to’ address you can add in a
full email address. Domain names can
also be entered as well but please note when entering domain names you would
not enter the @ symbol, just the domain name
Incorrect addition of
domain

Correct addition of domain

Digests and releasing emails
Digests contain information on any
quarantined emails where you can decide to release them or whitelist the
sender. They typically come in the following format

For each email that appears you can click
on the ‘Release’ link to release this from quarantine. Once this link has been clicked on you will
get a status message

There is the option to whitelist the sender
of the email or you can log straight into your control panel if you would
prefer to set the options from here.